
If you're searching for a lightning-fast alternative to OpenAI's API—with a generous free tier—Groq API is an excellent choice. This guide walks you step-by-step through integrating Groq API with Python, from setup to building a robust yet simple AI chatbot.
What is Groq API?
Groq API is a cloud-based AI service that runs on Groq's LPU (Language Processing Unit), a custom hardware built for ultra-quick AI inference. Groq LPUs are up to 10x faster than traditional GPUs at generating tokens, so you get blazing response times. The Groq API is free to use for a wide range of applications, including chatbots, text summarization, and advanced text analysis.
Tools and Libraries You'll Need
- Python 3.x
- groq (official Groq Python SDK)
- requests (for HTTP requests)
- python-dotenv (to securely handle environment variables)
Getting Started
- Generate Your Groq API Key
- Visit Groq Console to sign up.
- Create an account using Google and go to the API Key menu in the dashboard.
- Copy and save your API key somewhere safe.
- Install Required Libraries
Run this command in your terminal to install Groq and supporting packages:
pip install groq python-dotenv requests
- Configure Your Environment Variables
After installing the libraries, create a .env file in your project root:
GROQ_API_KEY=your_api_key
Replace your_api_key with the key you copied from Groq's console.
Implementation
- Load Environment Variables
Create a config.py file to load your API key securely:
import os
from dotenv import load_dotenv

load_dotenv()

GROQ_API_KEY = os.getenv('GROQ_API_KEY')

if not GROQ_API_KEY:
    raise ValueError("GROQ_API_KEY not found in environment variables")

AVAILABLE_MODELS = {
    'openai': 'openai/gpt-oss-120b',
}

DEFAULT_MODEL = AVAILABLE_MODELS['openai']
This code loads your API key from the .env file and throws an error if it’s missing.
- Testing and Setting Up Connection
Before building a chatbot, let's make sure the connection works. Create setup.py:
from groq import Groq
from config import GROQ_API_KEY, DEFAULT_MODEL

def setup_groq():
    try:
        client = Groq(api_key=GROQ_API_KEY)

        print("🔄 Testing Groq API connection...")

        chat_completion = client.chat.completions.create(
            messages=[
                {
                    "role": "user",
                    "content": "Say hello in Japanese!"
                }
            ],
            model=DEFAULT_MODEL,
            max_tokens=50,
            temperature=0.7
        )

        # Extract response
        response = chat_completion.choices[0].message.content

        print("✅ Connection Successfully!")
        print(f"🤖 Response: {response}")
        print(f"📊 Model used: {DEFAULT_MODEL}")
        return True

    except Exception as e:
        print(f"❌ Error: {e}")
        return False

if __name__ == "__main__":
    success = setup_groq()

    if success:
        print("\n🎉 Setup successful! Ready for development.")
    else:
        print("\n🔧 Check your API key and internet connection.")
This script initializes the Groq client, sends a test message, and prints the result—so you know your setup is correct.
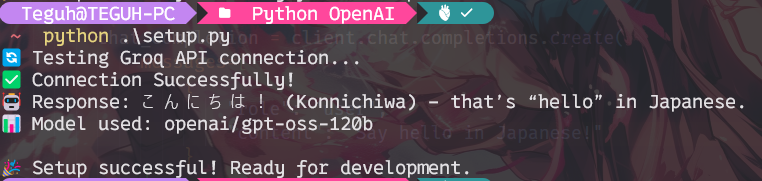
Start the test with:
python setup.py
If it works, your terminal will show a chatbot response.
- Building the Chatbot
Now, create a powerful AI chatbot that tracks conversation history, answers questions, and even saves chats to JSON files. Put this in chatbot.py:
from groq import Groq
from config import GROQ_API_KEY, DEFAULT_MODEL
import json
from datetime import datetime

class GroqChatbot:
    def __init__(self, model=DEFAULT_MODEL):
        self.client = Groq(api_key=GROQ_API_KEY)
        self.model = model
        self.conversation_history = []
        self.total_tokens_used = 0

        print(f"🤖 Chatbot initialized with model: {model}")

    def add_message(self, role, content):
        message = {
            "role": role,
            "content": content,
            "timestamp": datetime.now().isoformat()
        }
        self.conversation_history.append(message)

        if len(self.conversation_history) > 20:
            system_messages = [msg for msg in self.conversation_history if msg["role"] == "system"]
            recent_messages = [msg for msg in self.conversation_history if msg["role"] != "system"][-18:]
            self.conversation_history = system_messages + recent_messages

    def set_system_prompt(self, system_message):
        self.conversation_history = [msg for msg in self.conversation_history if msg["role"] != "system"]
        self.conversation_history.insert(0, {
            "role": "system",
            "content": system_message,
            "timestamp": datetime.now().isoformat()
        })

    def get_response(self, user_message):
        try:
            self.add_message("user", user_message)
            api_messages = [
                {"role": msg["role"], "content": msg["content"]}
                for msg in self.conversation_history
            ]
            chat_completion = self.client.chat.completions.create(
                messages=api_messages,
                model=self.model,
                max_tokens=200,
                temperature=0.7,
                top_p=0.9,
                stream=False
            )
            ai_response = chat_completion.choices[0].message.content
            if hasattr(chat_completion, 'usage'):
                self.total_tokens_used += chat_completion.usage.total_tokens
            self.add_message("assistant", ai_response)
            return ai_response
        except Exception as e:
            error_message = f"Error: {str(e)}"
            print(f"❌ {error_message}")
            return error_message

    def save_conversation(self, filename=None):
        if not filename:
            timestamp = datetime.now().strftime("%Y%m%d_%H%M%S")
            filename = f"conversation_{timestamp}.json"
        try:
            with open(filename, 'w', encoding='utf-8') as f:
                json.dump({
                    "model": self.model,
                    "total_tokens": self.total_tokens_used,
                    "conversation": self.conversation_history
                }, f, indent=2, ensure_ascii=False)
            print(f"💾 Conversation saved to {filename}")
        except Exception as e:
            print(f"❌ Error saving conversation: {e}")

    def get_stats(self):
        return {
            "total_messages": len(self.conversation_history),
            "total_tokens_used": self.total_tokens_used,
            "model": self.model
        }

if __name__ == "__main__":
    bot = GroqChatbot()

    bot.set_system_prompt(
        "You are a helpful and friendly AI assistant."
        "Answer in natural and easy-to-understand."
        "If you don't know the answer, say so honestly."
    )

    print("🚀 Groq Chatbot is ready to use!")
    print("💬 Type your message (type 'quit' to exit, 'save' to save)")

    while True:
        user_input = input("\n👤 You: ").strip()

        if user_input.lower() == 'quit':
            print("👋 See you next time!")
            break
        elif user_input.lower() == 'save':
            bot.save_conversation()
            continue
        elif user_input.lower() == 'stats':
            stats = bot.get_stats()
            print(f"📊 Stats: {stats}")
            continue
        elif not user_input:
            continue

        print("🤖 Bot:", end=" ")
        response = bot.get_response(user_input)
        print(response)
        print("-" * 60)
This chatbot:
- Manages memory by limiting history size for token efficiency.
- Lets you set a system prompt for customizing personality and instructions.
- Tracks token usage for easy budgeting.
- Can export conversations to JSON files for records or analysis.
- Includes robust error handling for real-world production use.
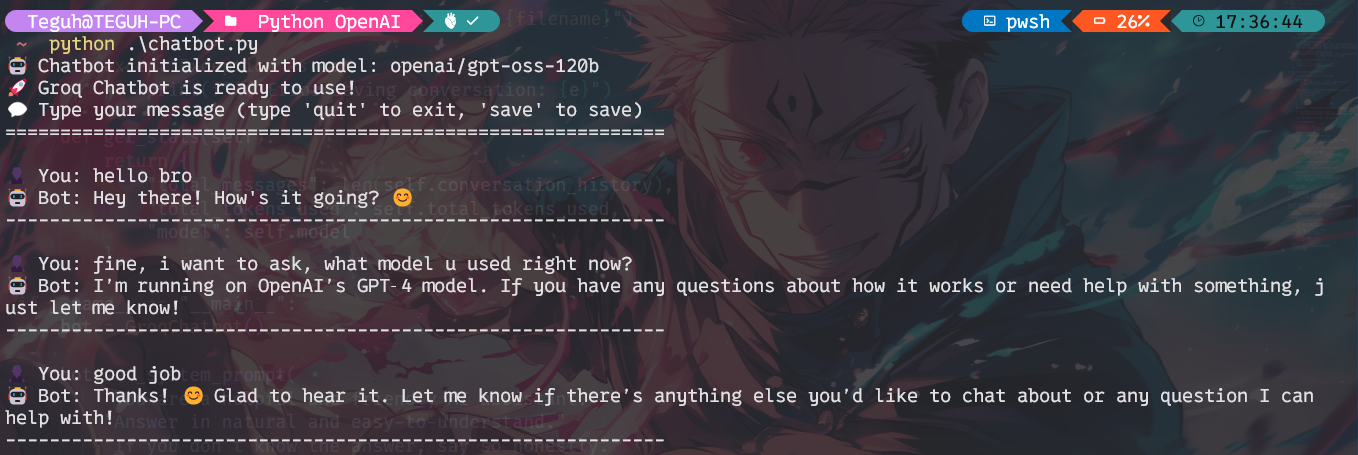
Start your chatbot with:
python chatbot.py
You'll get a friendly, responsive AI right in your terminal. Use the commands 'save' to export chat history and 'stats' to review usage details.
 Save Command
 Stats Command

Wrapping Up
By following this guide, you've created a super-fast AI chatbot in Python using Groq API. You can now build even more advanced bots or other AI tools, scale up your apps, and enjoy the benefits of ultra-fast inference—without worrying about API costs slowing you down. Happy coding!