Blockchain technology keeps gaining momentum, especially with Web3 promising true decentralization and transparency. For web developers, JavaScript has become the go-to language for blockchain interactions. Let's explore how JavaScript can interact with blockchain through Web3, complete with a simple implementation using the ethers.js library. First, we'll cover what Web3 actually is and why JavaScript has become the top choice for Web3 development.
What is Web3?
Web3, often called the "decentralized internet," represents the future vision of an internet built on blockchain technology. Blockchains like Ethereum, Binance Smart Chain, and Polygon form Web3's foundation. Gavin Wood, one of Ethereum's co-founders, first popularized this concept back in 2014. Web3 promises an internet where users have complete control over their data, identity, and digital assets.
Unlike Web 2.0, where tech giants like Google, Facebook, and Amazon dominate and control user data, Web3 embraces decentralization principles.
Why JavaScript Became the Top Choice for Web3 Implementation
JavaScript has emerged as the primary programming language for building decentralized applications (DApps). This isn't a coincidence - it's the result of strategic and technical factors that make it the preferred choice for Web3 developers. Here's why:
- JavaScript's Mature Ecosystem
JavaScript has been the web development standard for over two decades. When Web3 arrived as Web 2.0's evolution, developers didn't need to start from scratch. JavaScript's mature ecosystem - with millions of npm packages, stable frameworks, and sophisticated tooling - provides a solid foundation for building Web3 applications.
- Direct Browser-Wallet Integration
One reason JavaScript truly excels is its ability to integrate directly with browser extensions like MetaMask. In Web3, users frequently interact with blockchain through their wallets, and JavaScript enables provider "injection" through the window.ethereum object. This means DApps can request transaction approvals in real-time without intermediary servers, perfectly aligning with Web3's decentralization principles.
- Asynchronous Programming Model
Web3 development heavily relies on asynchronous processes like communicating with blockchain networks, waiting for transaction confirmations, and interacting with smart contracts. JavaScript, with its event-driven model and promise-based programming, is perfectly suited for handling these processes.
- Event-Driven Architecture
Blockchain operates as an event-driven system where program flow responds to specific events. In blockchain contexts, smart contracts can emit events, every transaction generates logs, and state changes need real-time monitoring. Since JavaScript is also event-driven with callbacks and asynchronous patterns, it naturally fits this paradigm.
Blockchain Fundamentals
Before diving deeper, let's understand blockchain basics:
Blockchain: A decentralized, secure, and immutable chain of data blocks. Each block contains transactions validated by network nodes.
Smart Contracts: Programs that run automatically on blockchain, like Ethereum's smart contracts written in Solidity.
Wallet: Tools for storing crypto assets and interacting with blockchain, such as MetaMask wallets that support JavaScript injection.
Node Provider: Services like Infura or Alchemy that provide APIs for connecting to blockchain without running your own node.
Getting Ready
Before starting implementation, you'll need these tools:
- VS Code
- Chrome Browser
- MetaMask browser extension installed
- JavaScript knowledge
Creating Your Project Scaffold
First, create a project scaffold using the npm create command:
npm create vite@latest js-web3-dapp -- --template vanilla
Installing ethers.js
Navigate into the js-web3-app folder you just created, then run this command to install the library:
npm install ethers
Implementation
Here's the code for your index.html file:
<!doctype html>
<html lang="en">
  <head>
    <meta charset="UTF-8" />
    <link rel="icon" type="image/svg+xml" href="/vite.svg" />
    <meta name="viewport" content="width=device-width, initial-scale=1.0" />
    <title>Interact Web3 with Javascript</title>
  </head>
  <body>
    <h1>Simple Web3 App</h1>
    <button id="connectButton">Connect MetaMask</button>
    <button id="checkBalanceButton" disabled>Check Balance</button>
    <p id="walletAddress"></p>
    <p id="balance"></p>
    <script type="module" src="/src/main.js"></script>
  </body>
</html>
Next, open your main.js file and add this code:
import { ethers } from 'ethers';

let walletState = { provider: null, signer: null, address: null };

async function connectWallet() {
  if (window.ethereum) {
    try {
      const provider = new ethers.BrowserProvider(window.ethereum);
      await provider.send("eth_requestAccounts", []);
      const signer = await provider.getSigner();
      const address = await signer.getAddress();
      console.log("Connected wallet:", address);
      document.getElementById("walletAddress").innerText = `Connected Wallet Address: ${address}`;
      document.getElementById("checkBalanceButton").disabled = false;

      walletState = { provider, signer, address };
      return walletState;
    } catch (error) {
      console.error("Error connecting wallet:", error);
      document.getElementById("balance").innerText = `Error: ${error.message}`;
    }
  } else {
    console.error("MetaMask not installed");
    document.getElementById("balance").innerText = "Error: Please install MetaMask";
  }
  return {};
}

async function checkBalance(provider, address) {
  try {
    const balance = await provider.getBalance(address);
    const balanceInEth = ethers.formatEther(balance);
    document.getElementById("balance").innerText = `Balance: ${balanceInEth} ETH`;
  } catch (error) {
    console.error("Error checking balance:", error);
    document.getElementById("balance").innerText = `Error: ${error.message}`;
    document.getElementById("balance").className = "error";
  }
}

document.getElementById("connectButton").addEventListener("click", async () => {
  const { signer } = await connectWallet() || {};
  if (signer) {
    const address = await signer.getAddress();
    document.getElementById("walletAddress").innerText = `Connected Wallet Address: ${address}`;
  }
});

document.getElementById("checkBalanceButton").addEventListener("click", async () => {
  if (walletState.provider && walletState.address) {
    await checkBalance(walletState.provider, walletState.address);
  }
});
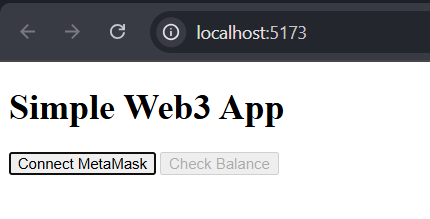
Testing Your Application
Open a new terminal and run this command to start your local server:
npm run dev
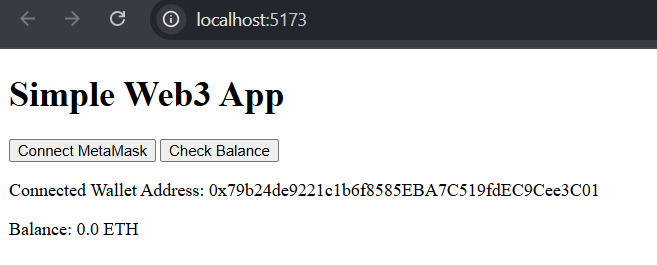
Then open your browser and navigate to the provided host http://localhost:5173/.
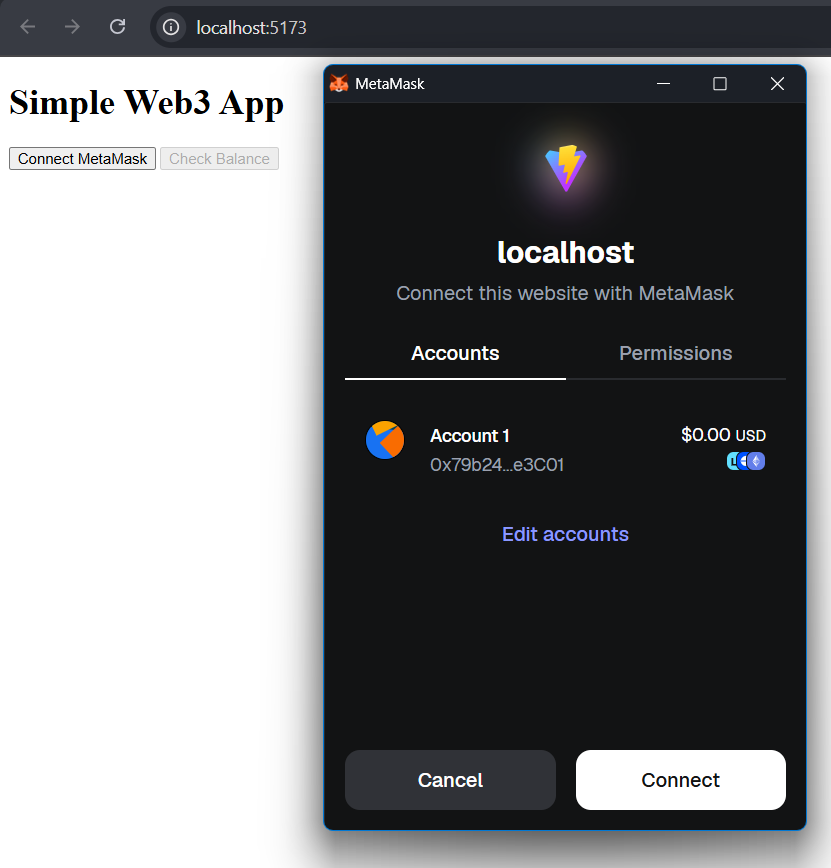
 Click the "Connect MetaMask" button, and you'll see a popup from your MetaMask wallet. Click the connect button in the extension popup.
NOTE: If you haven't created a MetaMask account before, you'll be prompted to create a MetaMask wallet first.
 Your MetaMask wallet will successfully connect to your application.
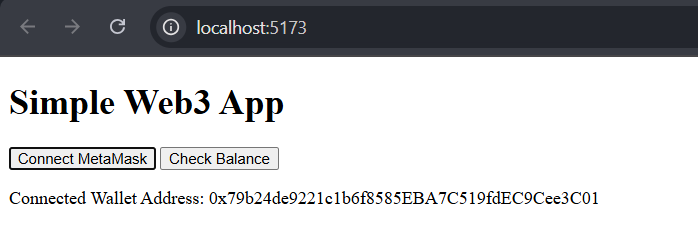 After that, try clicking the "Check Balance" button, which will check your balance on the Ethereum blockchain.
The Bottom Line
JavaScript makes blockchain interaction incredibly accessible for developers. With libraries like ethers.js, reading data and executing transactions becomes much simpler. If you're interested in getting started, begin with this lightweight setup and practice directly on testnets to understand the workflow.
The combination of JavaScript's familiar syntax, robust ecosystem, and natural fit with Web3's asynchronous, event-driven nature makes it the perfect choice for building the next generation of decentralized applications. Whether you're a seasoned web developer or just starting your blockchain journey, JavaScript provides the most straightforward path into Web3 development.
Thanks for reading!